How to Remove Popcorn Ceiling in 7 Easy Steps
Popcorn ceilings were once the height of home decor fashion. But trends change. Today, these textured ceilings are seen as outdated and can even pose health risks.
Popcorn Ceilings
A Brief History of Popcorn Ceilings
Popcorn ceilings emerged in the 1950s. They were popular because they hid imperfections and provided sound insulation.
However, by the 1980s, their appeal had waned. Smooth ceilings became the new standard, and popcorn ceilings began to look dated.
Asbestos Health Concerns
One of the biggest concerns with popcorn ceilings is asbestos. Homes built before 1980 often contain this harmful material. Asbestos can cause serious health issues when disturbed.
Testing for asbestos is important before any removal work begins. The Environmental Protection Agency (EPA) provides guidelines for safe asbestos testing.
The National Library Of Medicine evaluated the K2 asbestos screening test and found it unreliable due to high false-positive rates.
If your home was built before 1980, your ceilings must be tested for asbestos. It’s imperative for your safety. You can find certified asbestos inspectors through the EPA’s website or local health departments.
Essential Preparations
Asbestos Testing

Before you do anything:
- Test your ceiling for asbestos.
- Collect a small sample and send it to a lab for analysis.
- If you need help with this, hire a professional.
Certified inspectors can ensure safe and accurate testing.
Gathering Your Tools
You’ll need several tools for this job. Ensure you have drop cloths, a garden sprayer, a wide putty knife, safety glasses, a mask, and plastic sheeting. Each of these items is essential for a safe and effective removal process.
Protecting Your Workspace
Cover the floor and any furniture with drop cloths and plastic sheeting. This will protect your belongings from dust and debris. Proper ventilation is also important. Open windows and use fans to keep the air flowing.
How to Remove Popcorn Ceiling
Step 1: Test for Asbestos
Safety must come first. Scrape a small ceiling area and send the sample to a lab for analysis. If asbestos is present, hire a professional to remove it. Don’t take any risks with your health.
Step 2: Prepare the Room
Protect your space. Cover floors and walls with drop cloths. Remove or cover all furniture. Ensure you have safety equipment like gloves, masks, and goggles ready.
Step 3: Moisten the Ceiling
Fill a garden sprayer with water. Spray the ceiling evenly, making sure it’s thoroughly damp. Let the water soak in for 15-20 minutes. This will loosen the texture and make scraping easier.
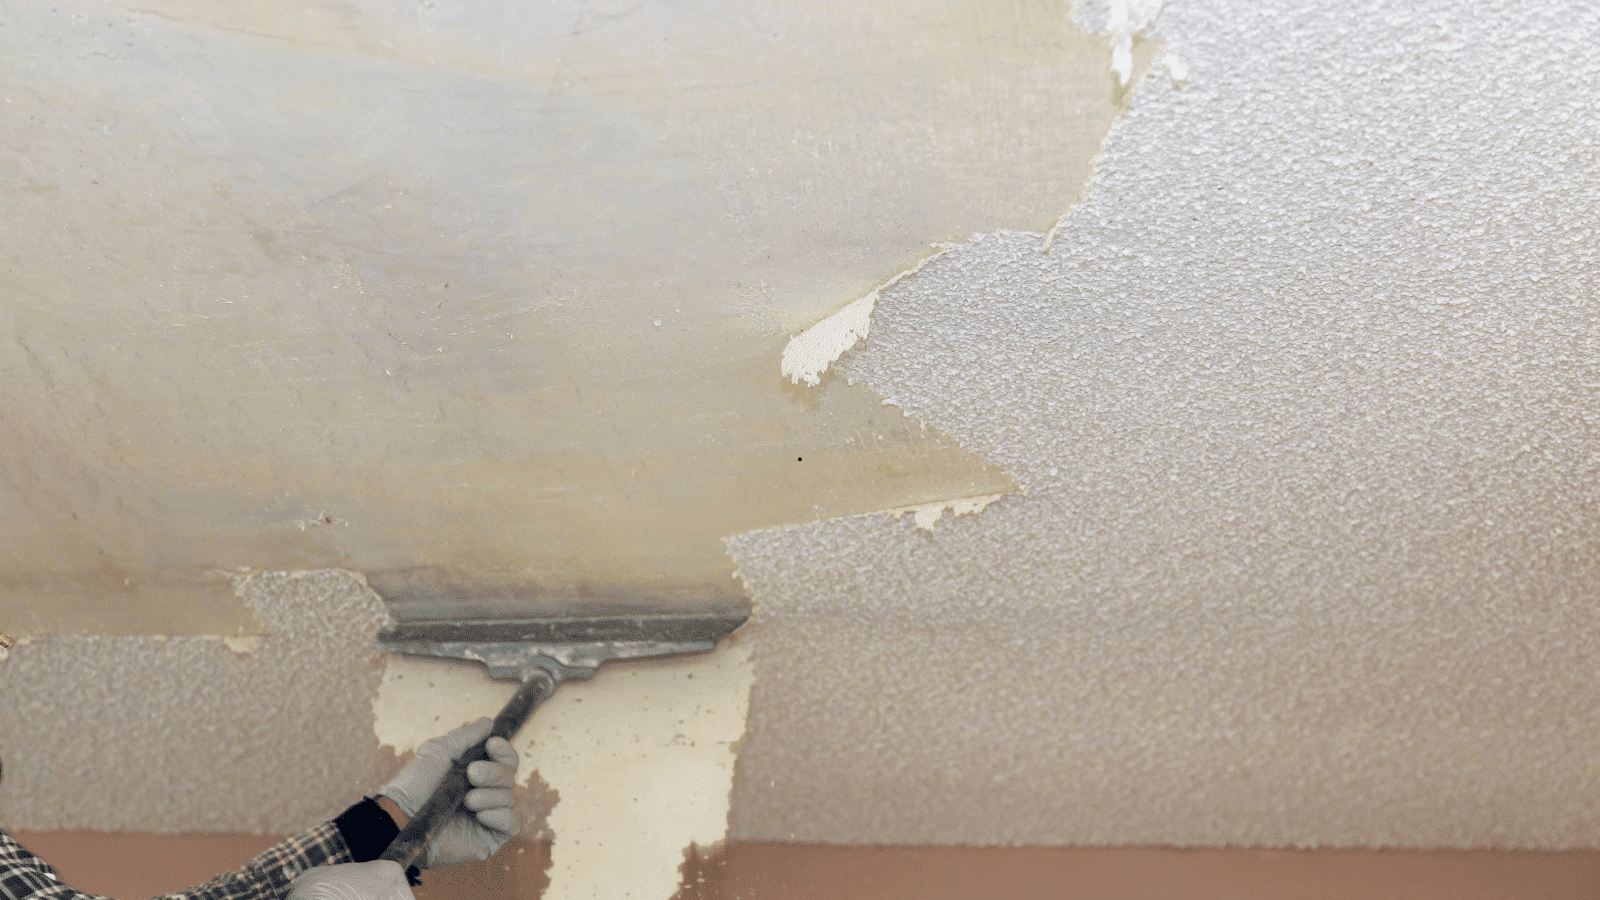
Step 4: Scrape Off the Popcorn Texture
Use a wide putty knife to scrape off the popcorn texture gently. Work in small sections to keep the task manageable. Be gentle to avoid damaging the drywall underneath.
Step 5: Smooth the Ceiling
Inspect the ceiling for damage. Use a drywall compound to fill in any imperfections. Once dry, sand the ceiling until smooth. A pole sander can help you do this without making a mess.
Step 6: Clean Up the Mess
Dispose of the removed popcorn material in sealed trash bags. Follow local regulations for disposal. Thoroughly clean the room to ensure no residue is left behind. Dust and debris can settle in hidden places, so be diligent.
Step 7: Prime and Paint the Ceiling
Apply a high-quality primer to the ceiling. This ensures the paint adheres well. Once the primer is dry, paint the ceiling evenly. Use a roller for a smooth finish, and apply at least two coats for the best results.
Common Issues And How To Deal With Them
Dealing with Stubborn Popcorn Texture
Use a stronger scraping tool if the texture doesn’t come off easily. Be cautious to avoid damaging the drywall. Alternatively, chemical popcorn ceiling removers can help. Follow product instructions and safety precautions carefully.
Uneven Surfaces After Scraping
If you notice gouges or uneven areas, use a joint compound to smooth them out. Apply the compound thinly and evenly, then sand it smooth once it dries. This step is important for a polished finish.
What to Do with Removed Popcorn Material
Seal the popcorn debris in trash bags and dispose of them according to local regulations. Be mindful of potential asbestos contamination. Always err on the side of caution and handle the waste appropriately.
Bottomline
These seven steps will help you transform your home and modernize its appearance. Start by testing for asbestos.
Prepare your workspace carefully. Then, follow each step methodically to achieve a smooth, stylish ceiling. A little effort goes a long way in creating a fresh, updated look for your home.